I’d originally planned to take it easy on the cooking front over Easter, and just have a long, quiet weekend. Then, as I was making some last minute adjustments to my Ocado order, I decided, somewhat randomly, that it would be a good idea to make a pork pie. I added a shoulder of pork to my basket, and the plan was fixed. Pork pie it was.
I’ve had a few stabs at making pork pies in recent months – it was the first challenge that I set for my friend Anya over on our Challenge Anya blog, and I’ve had a few attempts at refining my technique since then. It was rather harder than I expected. My pastry was either too thick, or it was full of holes, my meat filling was often blander than I would have liked. And the jelly always leaked. No matter what I did, I would end up with holes and cracks in my pastry and I’d end up with more jelly on the plate than I had in the pie, although in the end I did manage some acceptably good results. Throughout this whole process, I had completely forgotten that The Prawn Cocktail Years included a pork pie recipe. It was time to try it and see how it compared with my earlier efforts.
It turns out that the recipe in the book is something of a cheat. It’s not a Hopkinson/Bareham recipe at all. It’s actually Jane Grigson’s recipe from her book English Food. Here, they simply quote Grigson’s recipe verbatim. Well, if it’s so good that they felt they couldn’t improve on it at all, I guess there must be something in it.
Jellied Stock Ingredients
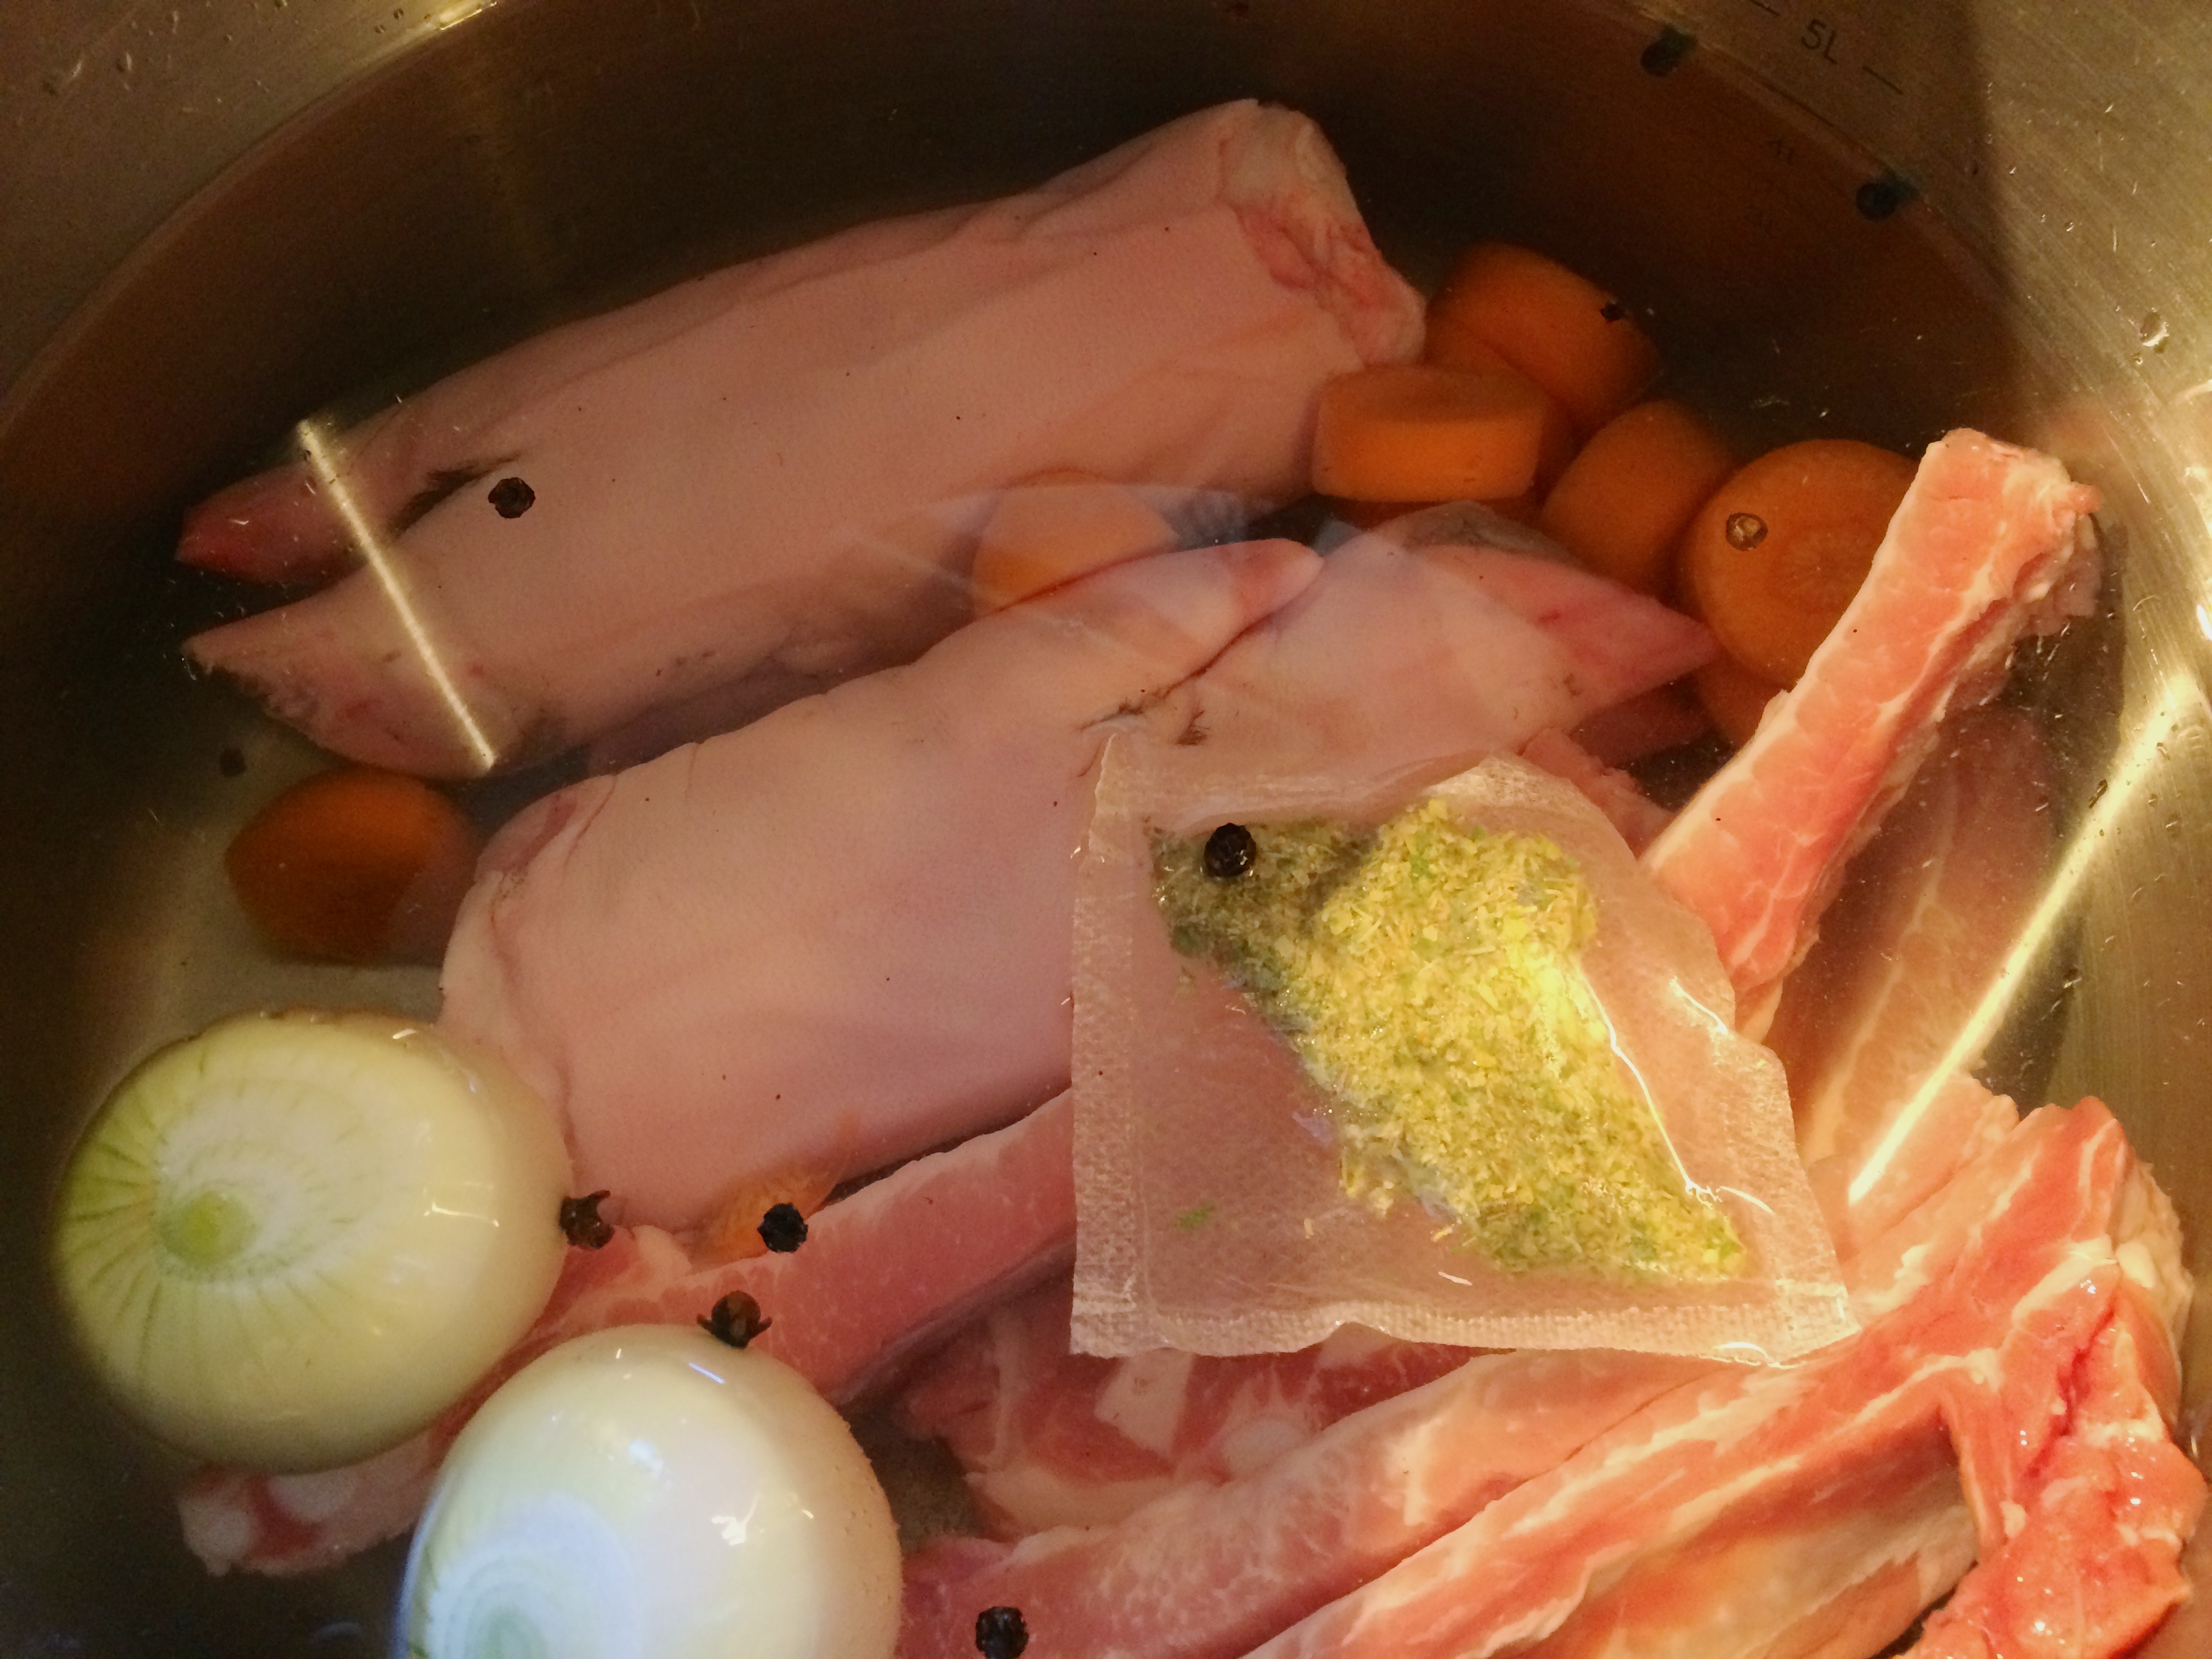
A key part of a pork pie is the jelly. This is used to fill in the gaps that form inside the pie once the meat has cooked and shrunk away from the pastry walls. All the jellies I’d been making used gelatine as the setting agent. Here, I was to make a proper jellied stock from scratch. Luckily, I happened to have a couple of pig’s trotters in the fridge (doesn’t everybody?). These were placed into the stock pot along with the some onion and carrot, a bouquet garni and some peppercorns. I was also supposed to add the bones from the pork shoulder, but as this was a last minute decision, the only pork shoulder I could get was boneless. I did have some spare ribs though, they would surely make a reasonable substitute. In they went. I added 2.8 litres of cold water, brought the pan to the boil, skimmed the foam, and then left it to simmer for four hours.
Pork Pie Filling
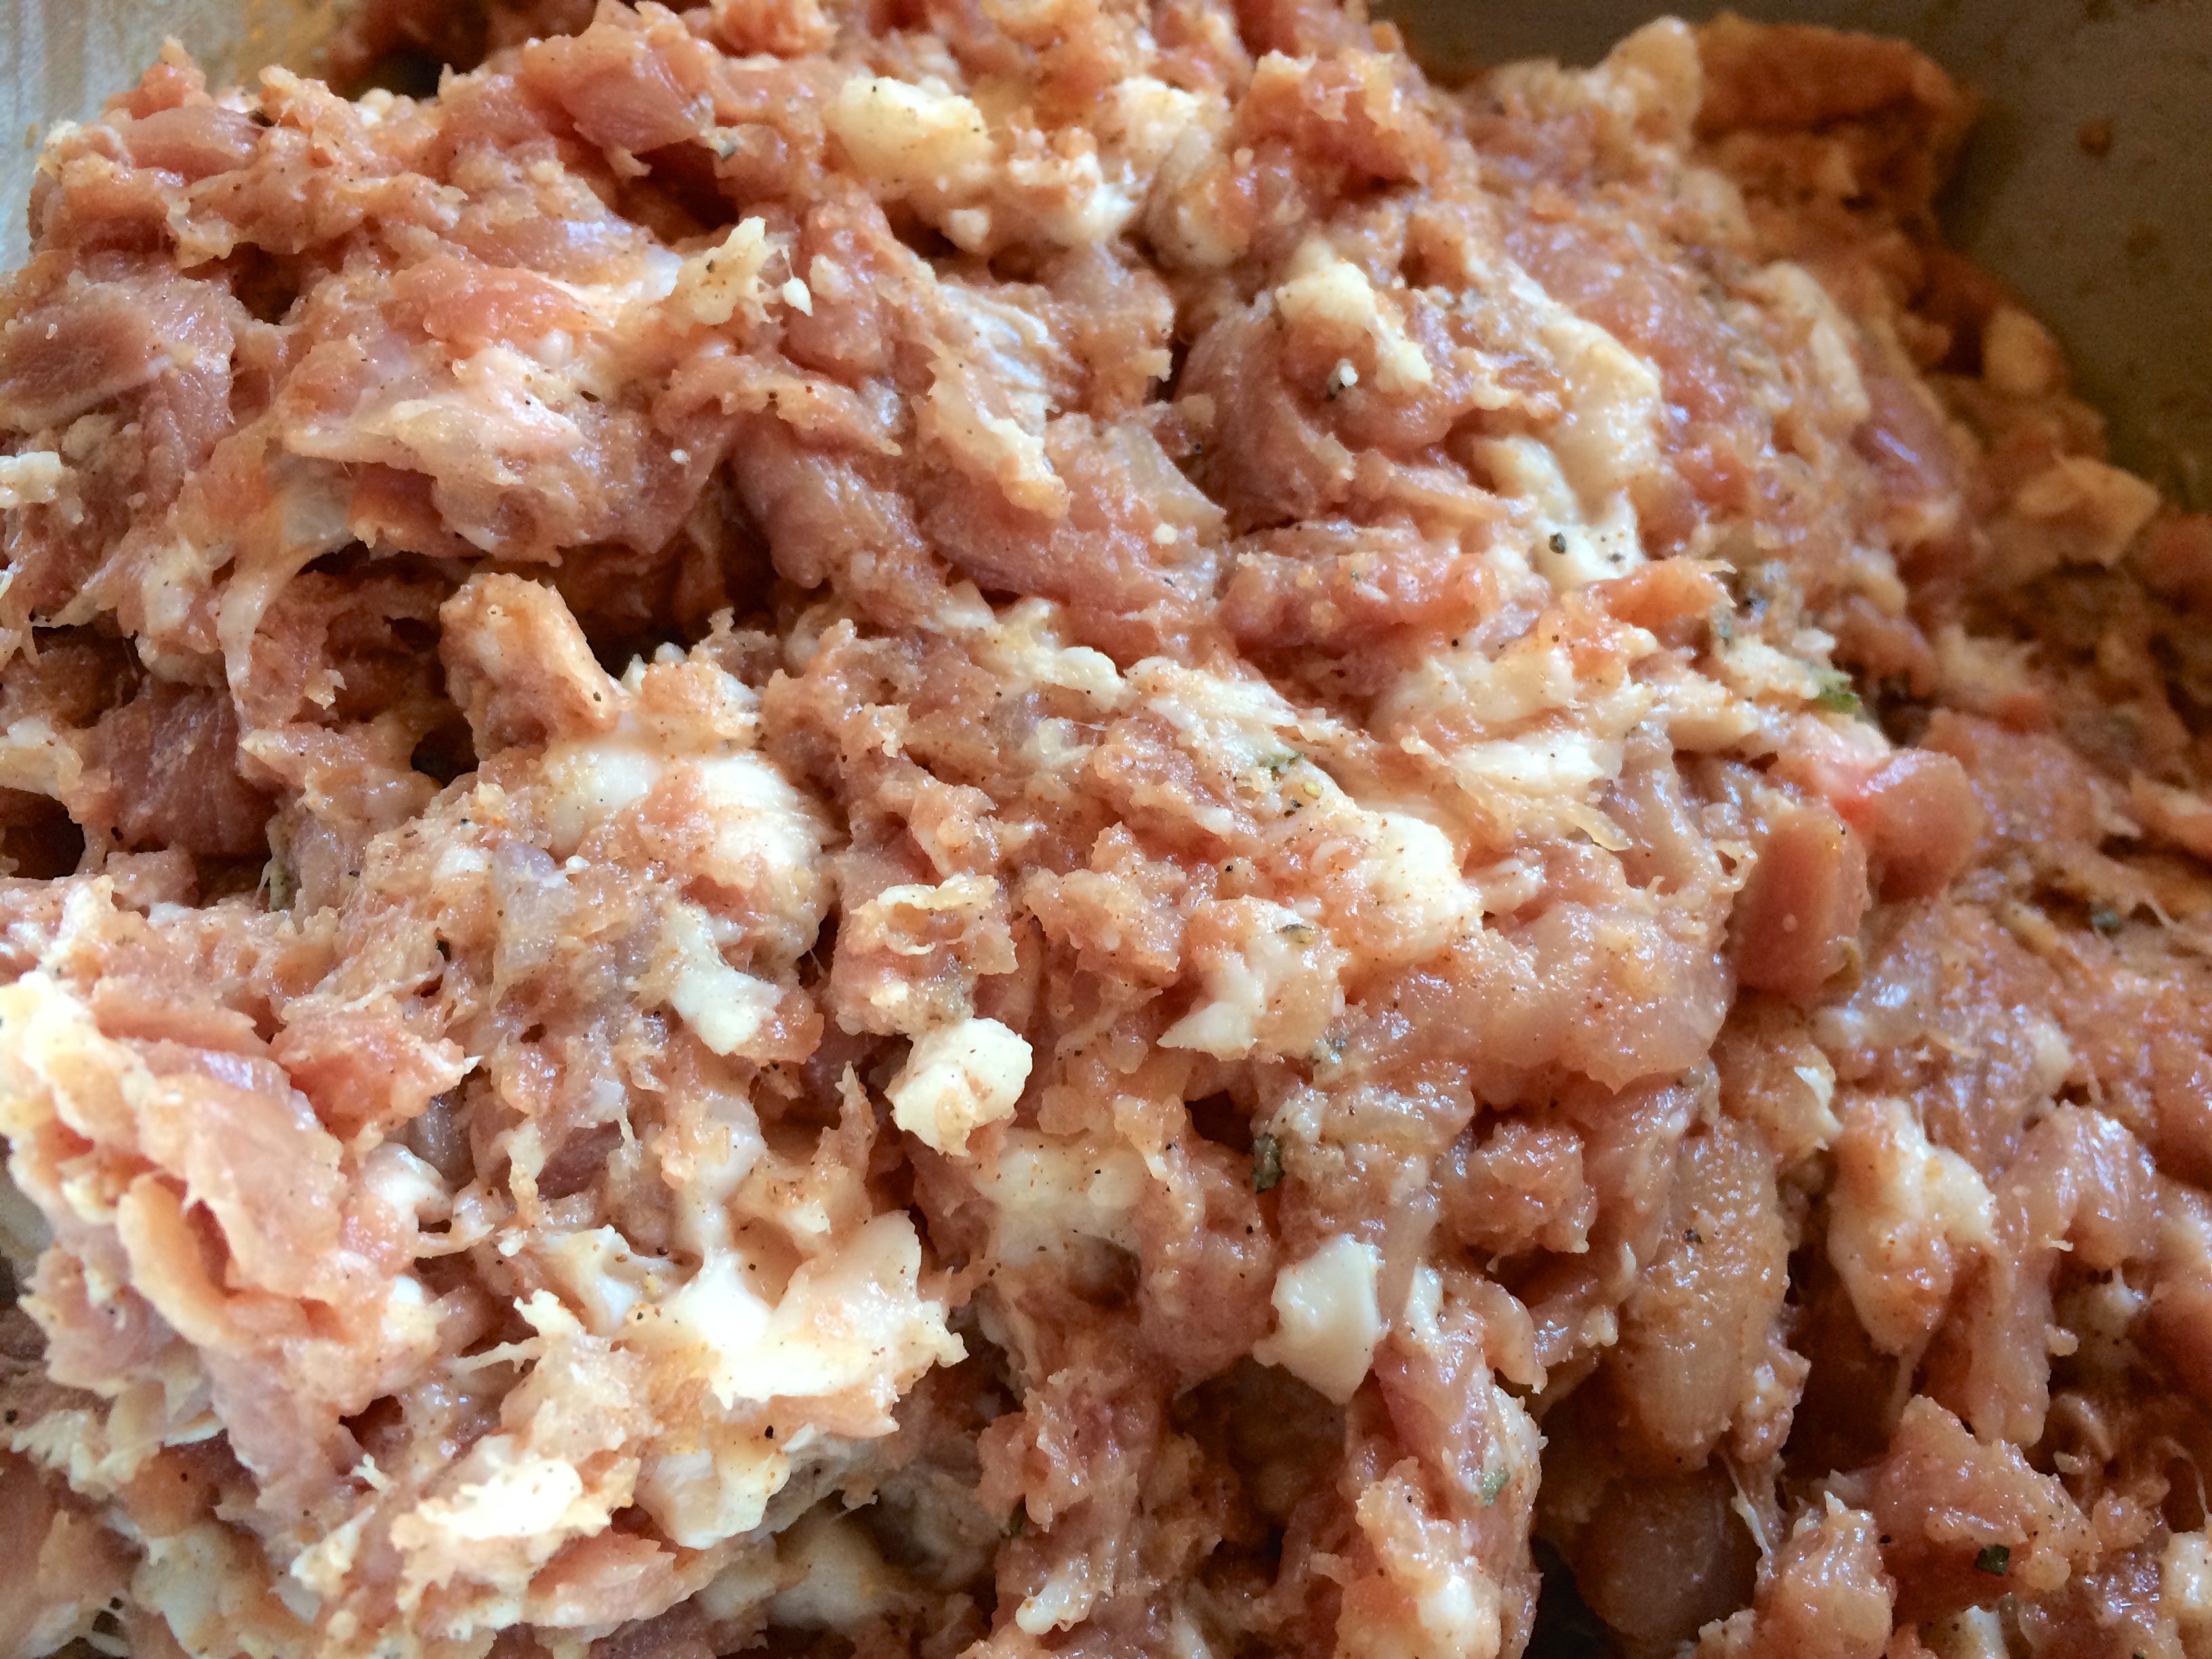
Whilst the stock was simmering, I started work on the filling. The pork shoulder was enormous – way more than I needed, so I cut off the required amount, being careful to get the ratio of fat to meat as specified in the recipe (¼ fat to ¾ lean meat). I diced the remainder of the pork and put it in the freezer for another day. The recipe instructs “chop some of the best bits of pork into 0.5cm dice”. What were the “best bits”? They all looked pretty good to me. And how much is “some”? In the end I took nearly half of the lean meat and used that. The next instruction is to mince the rest of the pork, together with a little bacon, although if you read further, there’s an aside later on that tells you that you will get a better texture if you finely chop rather than mince. I compromise and whizz the meat and the rest of the bacon in the food processor for a few seconds. Now for the seasonings: chopped sage, cinnamon, nutmeg, allspice, salt and black pepper. And there’s that elusive anchovy essence again. One day, I’ll manage to track some down, but for now, it was once again replaced by chopped anchovy fillets and a dash of worcestershire sauce. I mixed all the ingredients thoroughly and fried up a small piece to test. Hmm, not bad. Quite tasty, in fact.
Next, the pastry. Pork pies have a hot-water crust pastry, and the recipe here was very much like the one I usually follow in my trusty old Dairy Book of Home Cookery, but it did seem to contain rather more water that I was used to adding. Well, I’m sure Grigson knows best. I placed the water and lard in a pan and brought it to the boil, then mixed it into the flour and salt, together with an egg. Then, I realised, we had a slight problem. The thing about deciding to make something like this on the spur of the moment, is that you don’t always think things through carefully enough. I needed a tin to cook it in. The pork pies I had been making have been rather smaller affairs. This one was quite a beast of pie, my usual tin was going to be wholly inadequate. I looked for a cake tin. The smallest one I had, I was sure, was the one I had just bought the previous week – 20cm diameter, but quite tall. That was way too large. I rummaged through all the cupboards, and eventually found an old cake tin that I’d completely forgotten we had. It was a little smaller, and not so tall. It looked just right.

Pastry-lined Tin
I removed a quarter of the pastry to use as the lid, and placed the remaining pastry in the bottom of the tin. Using my fingers, I spread it out so it covered the bottom and sides. It was definitely softer than the pastry I usually used. I’d learned from previous experiences that it was all too easy to leave way too much pastry in the corners of the tin, so I made extra effort to ensure the pastry wall wasn’t too thick there. It was looking good.
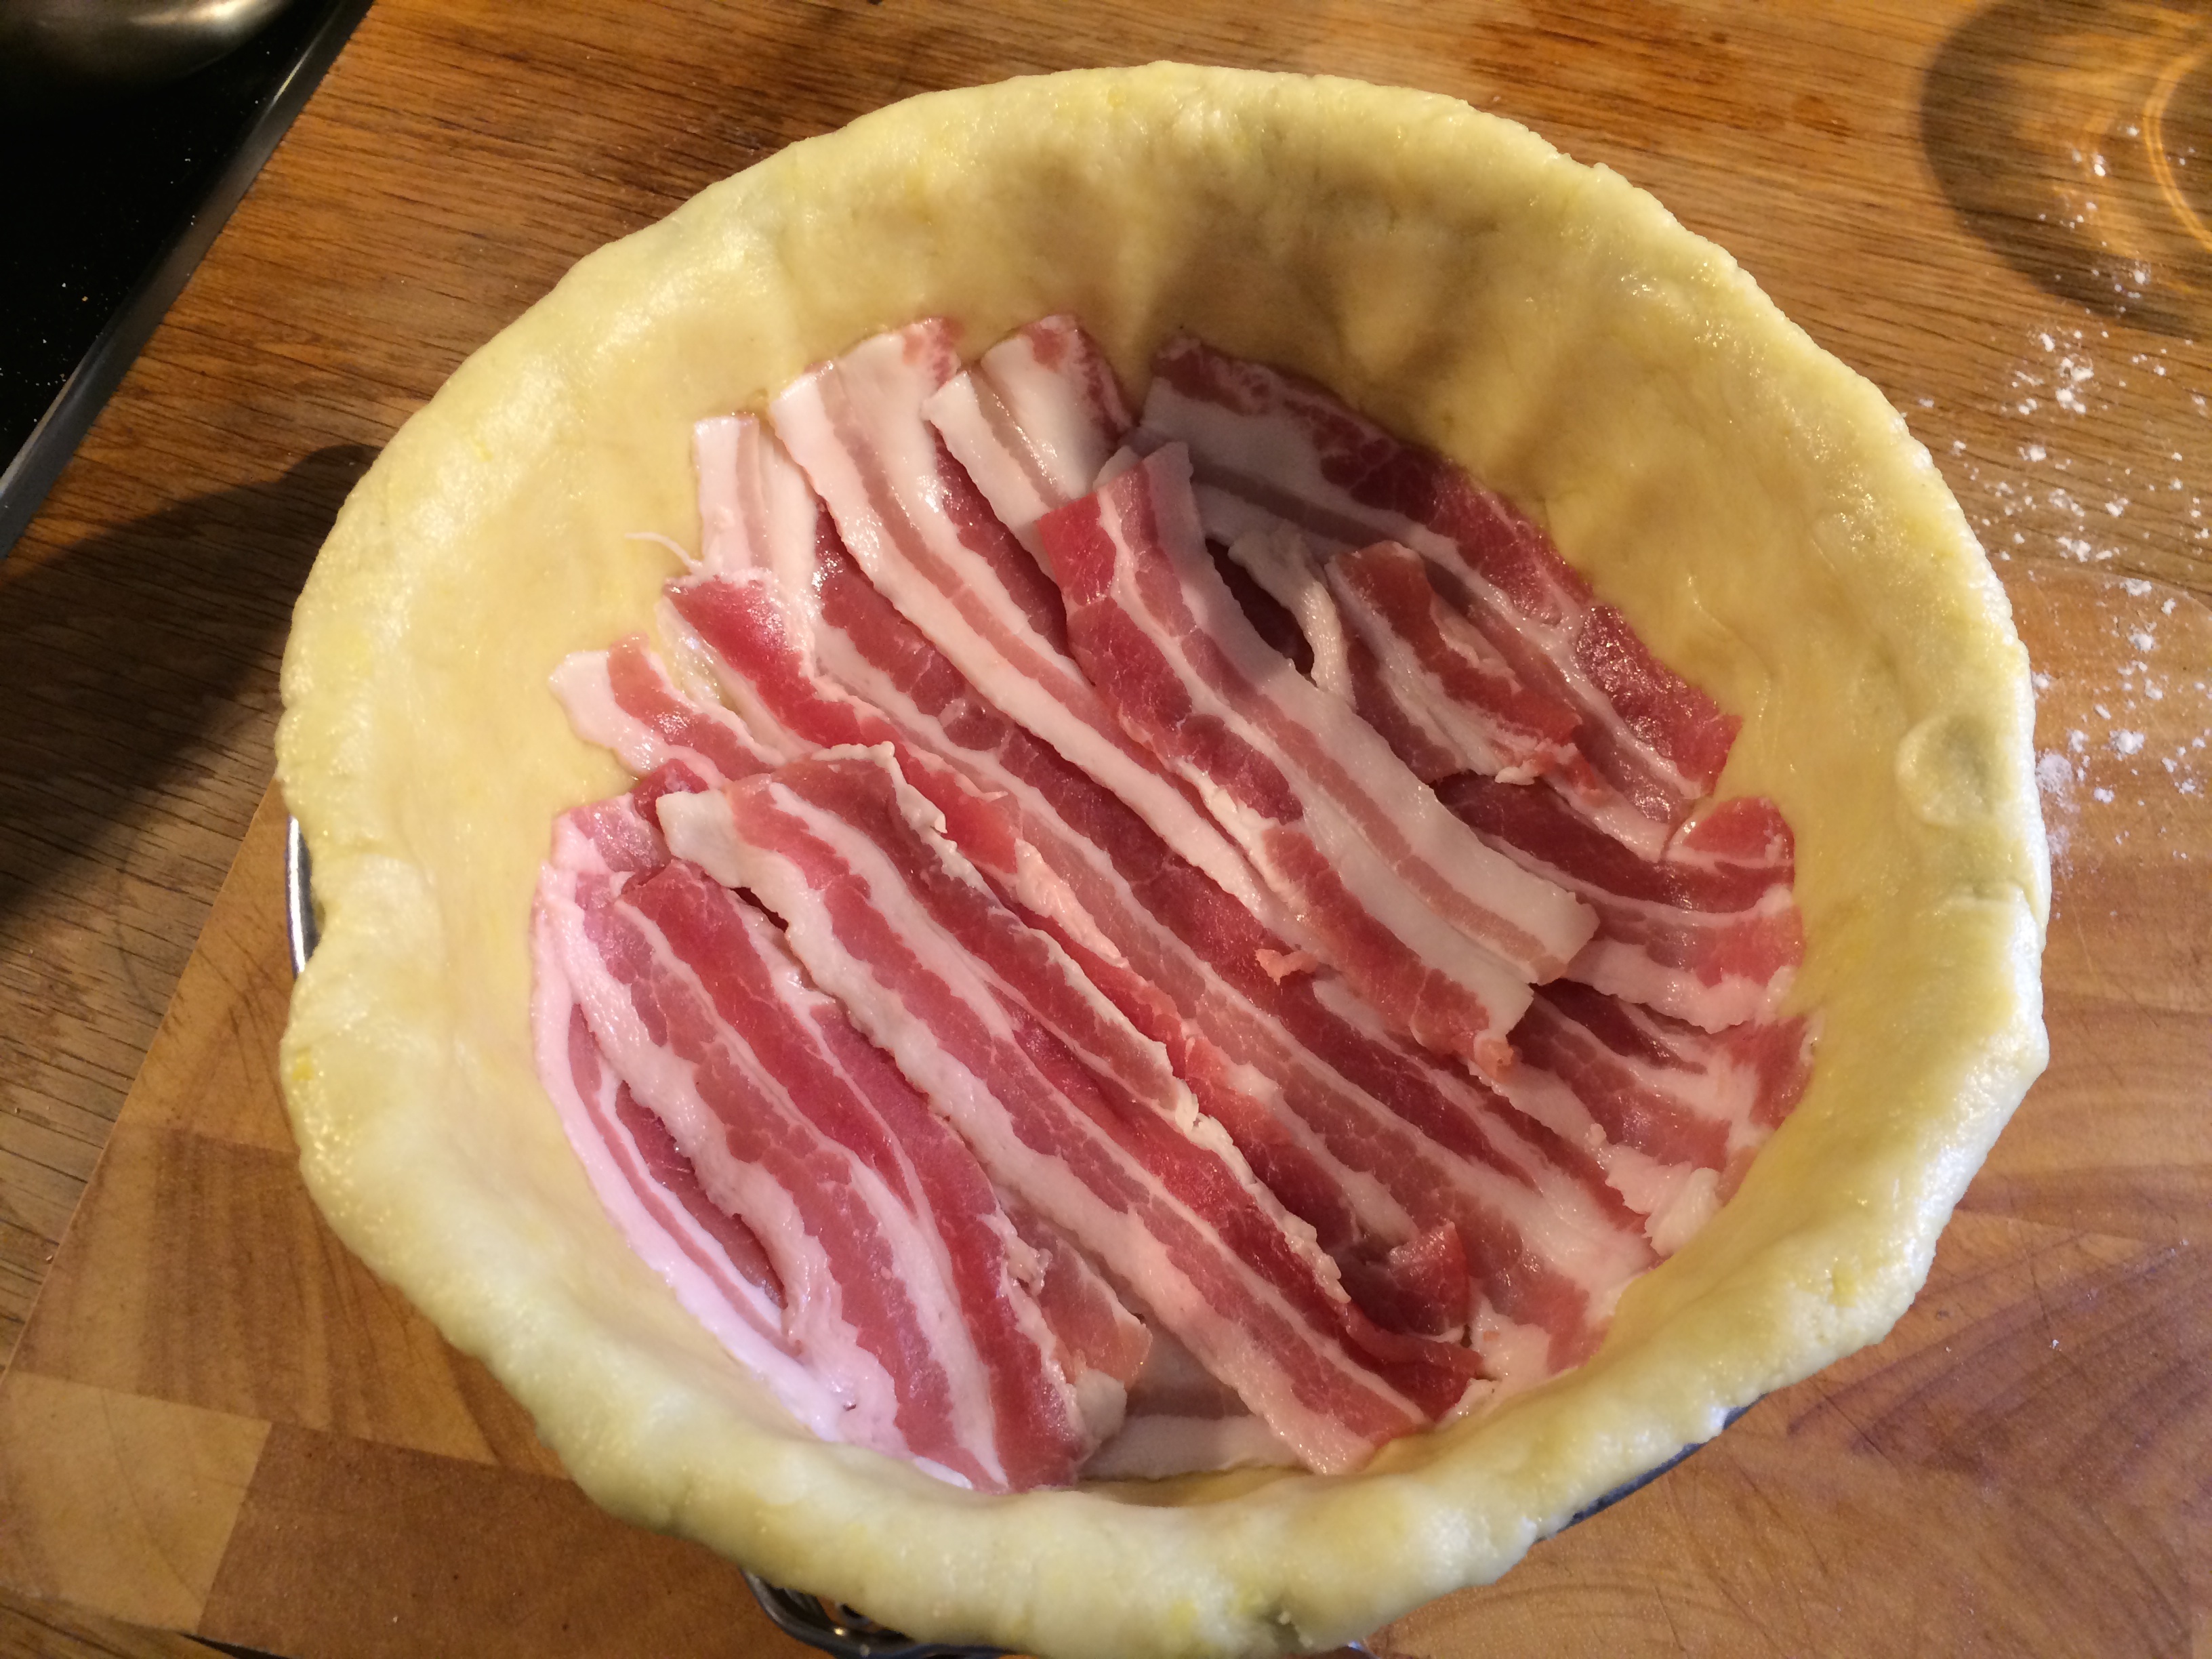
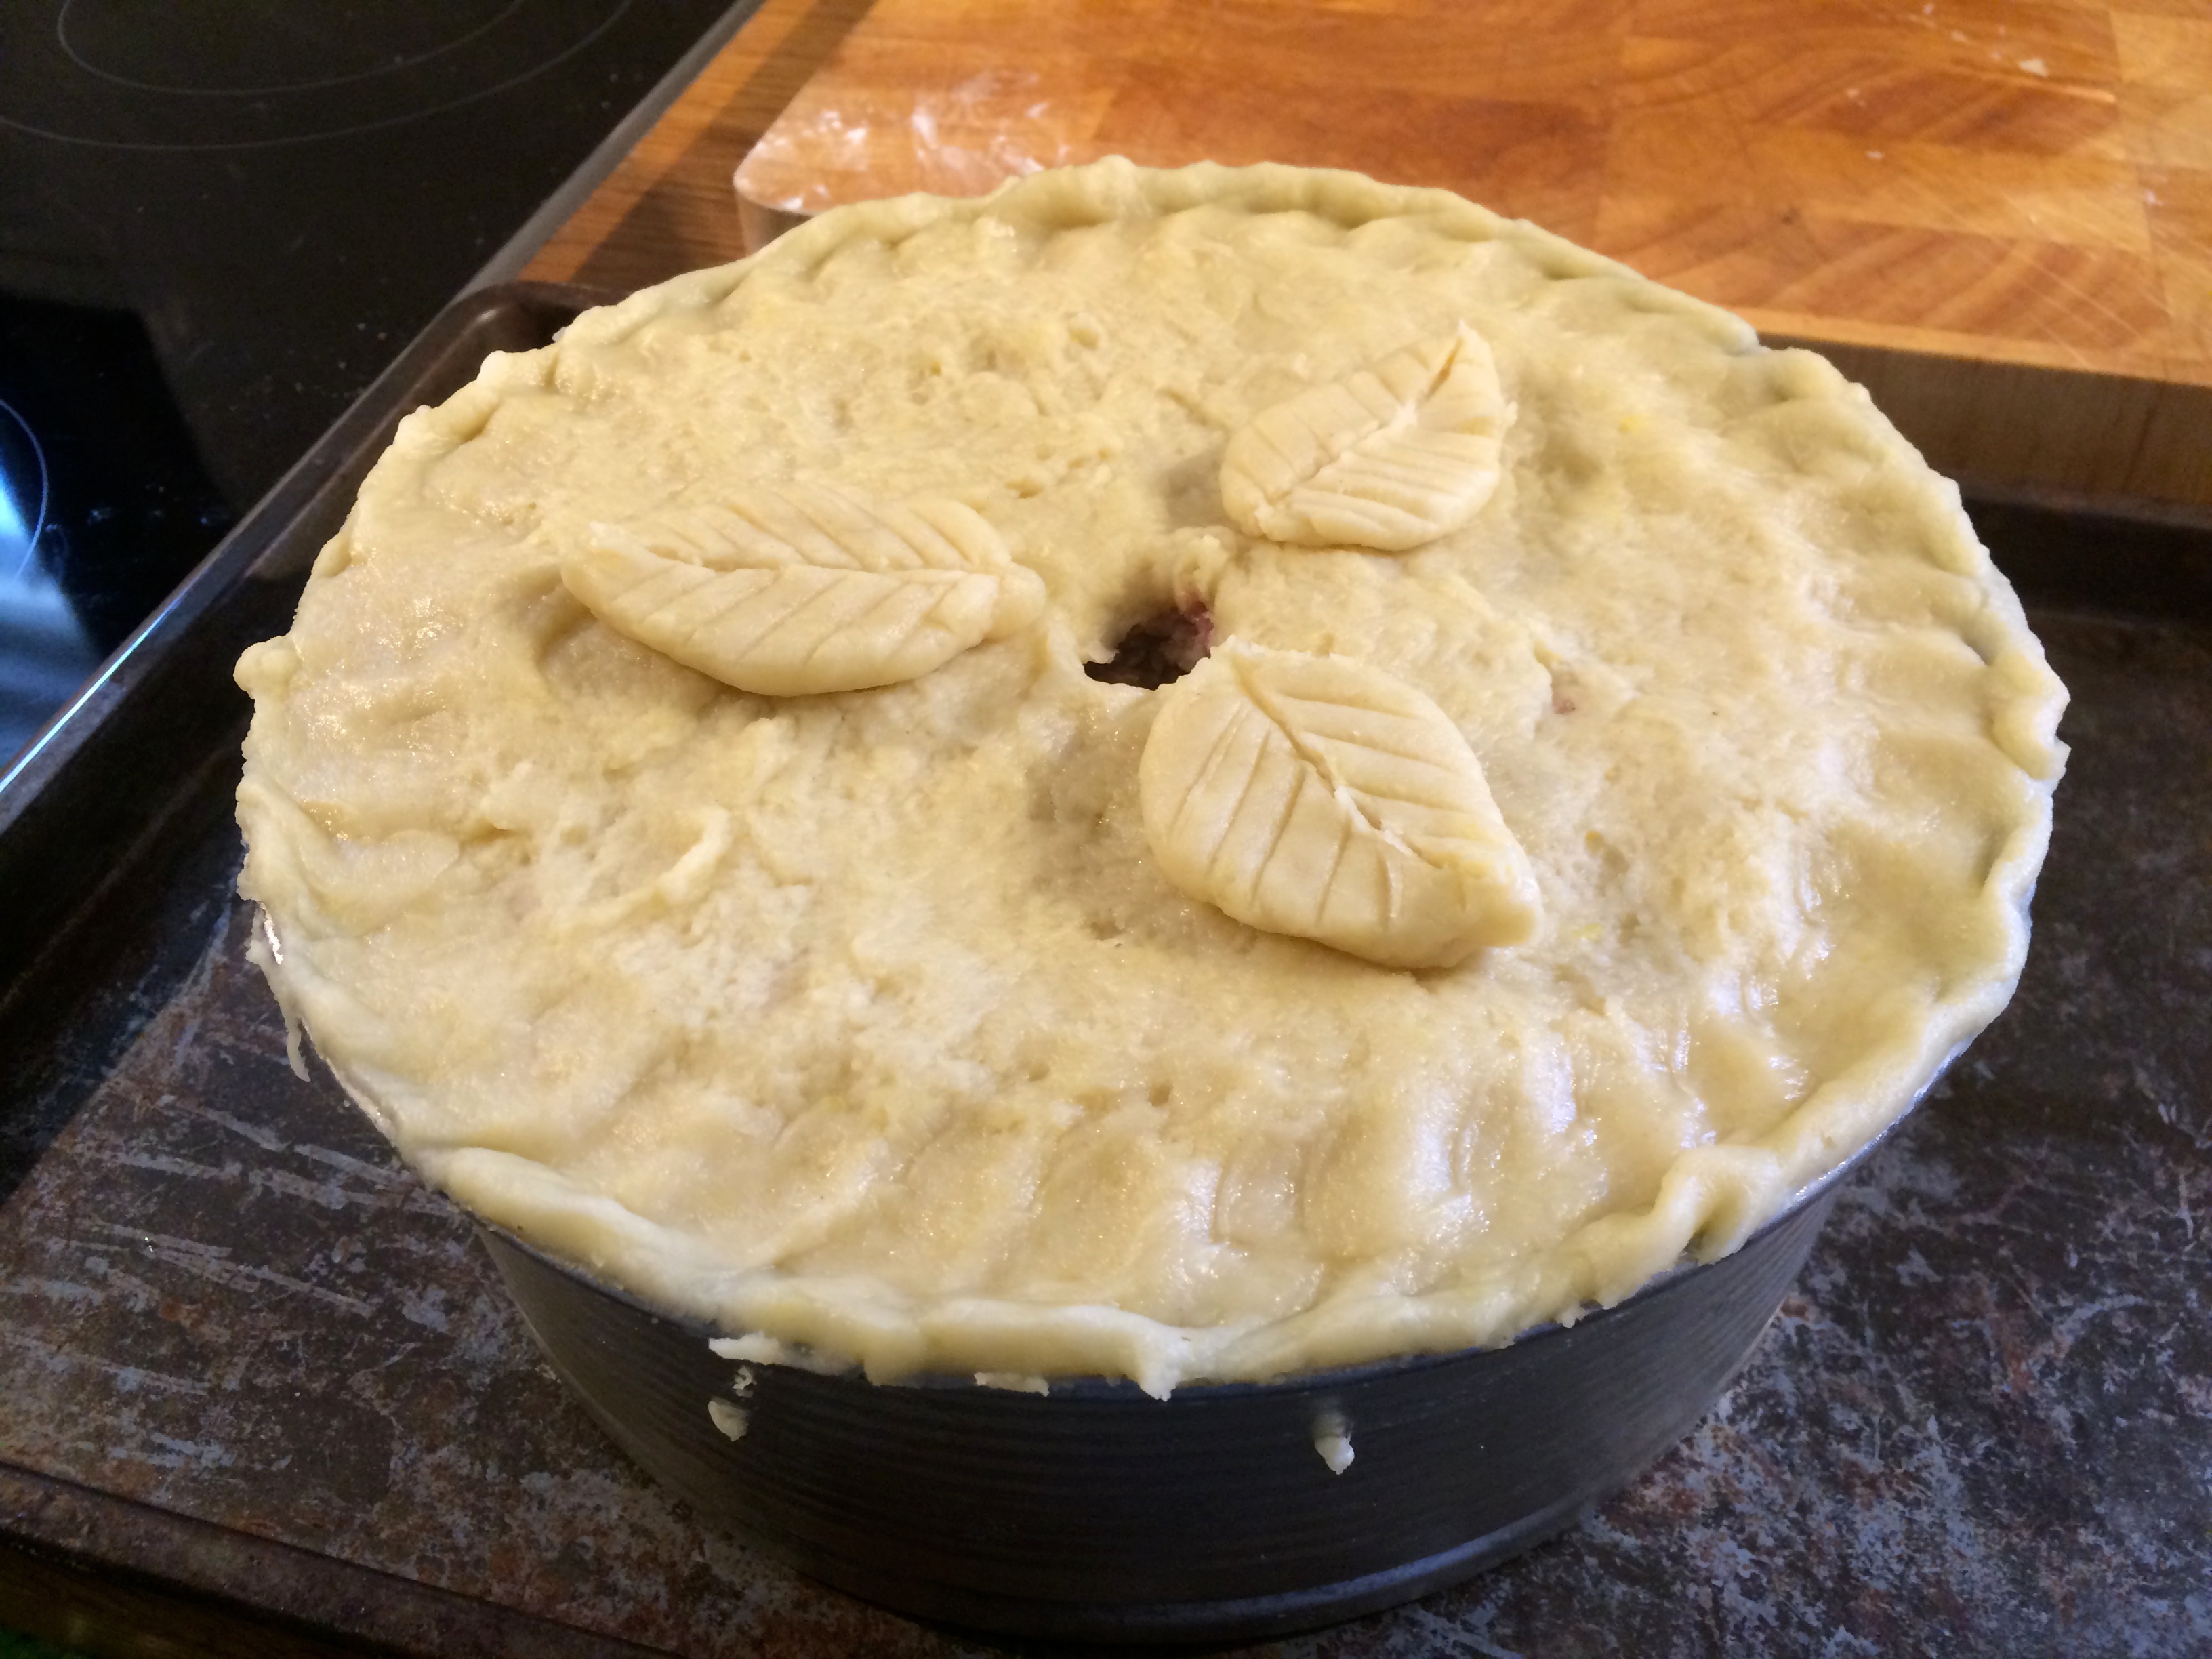
Bacon Bottom
Before putting the filling in, the Grigson recipe has you line the base of the pastry with strips of bacon. That seemed like an odd thing to do – I’ve never heard of that before. But, hey, more bacon is always good. So, I lined the base with bacon and added the filling. It fitted perfectly, coming just to the top of the tin. I fashioned the remaining piece of pastry into a rough circle, and placed it on top of the pie, and sealed the edges. Finally, I made a small hole in the centre of the top, decorated it with a couple of pastry ‘leaves’, and brushed it with beaten egg.
Oven-ready
Now for the baking. Half an hour at 200˚C, then two hours at 170˚C. Then, the hard bit: remove the tin. It was a springform tin, so in theory, all I needed to do is release the clasp and lift it off. I knew it couldn’t possibly be that easy, and I was right. As I opened the clasp, I could see the pastry wall stick to the tin and start to break away. I managed to salvage it before it broke off completely and wedged it back in place, but there were now a couple of sizeable cracks in the side wall of the pie. The pastry seemed much softer than I was used to – presumably a result of the extra water. Oh well, too late to do anything about that now. I brushed the sides with beaten egg and returned the pie to the oven for a final half hour.
Whilst the pie was baking, I finished off the stock: I strained it in a colander, poured the liquid into a clean pan and reduced it until I was left with about 400ml of concentrated pig’s trotter.
When the pie came out of the oven, it looked great. All that remained was to fill it with the jellied stock and then leave it to cool and set. The fissures running through the side walls meant that that was not going to be easy. I’d had this problem before though, I knew what I needed to do. I folded some aluminium foil into a long strip and wound it around the sides of the pie, tying it in place with string. The string kept slipping; it wasn’t tight enough. I’d used elastic bands before, bit that was on a smaller pie. I have a couple of silicone bands used for tying up roasting joints, and I managed to use those to hold everything tightly in place. With a little luck, that should be sufficient to hold the stock in until it cooled and set. I poured a little into the hole in the top of the pie and waited. It looked to be holding. I poured in more stock until the pie seemed to be full. A little had started to leak, but not too much. I was hopeful. I let the pie cool further then put it in the fridge overnight.
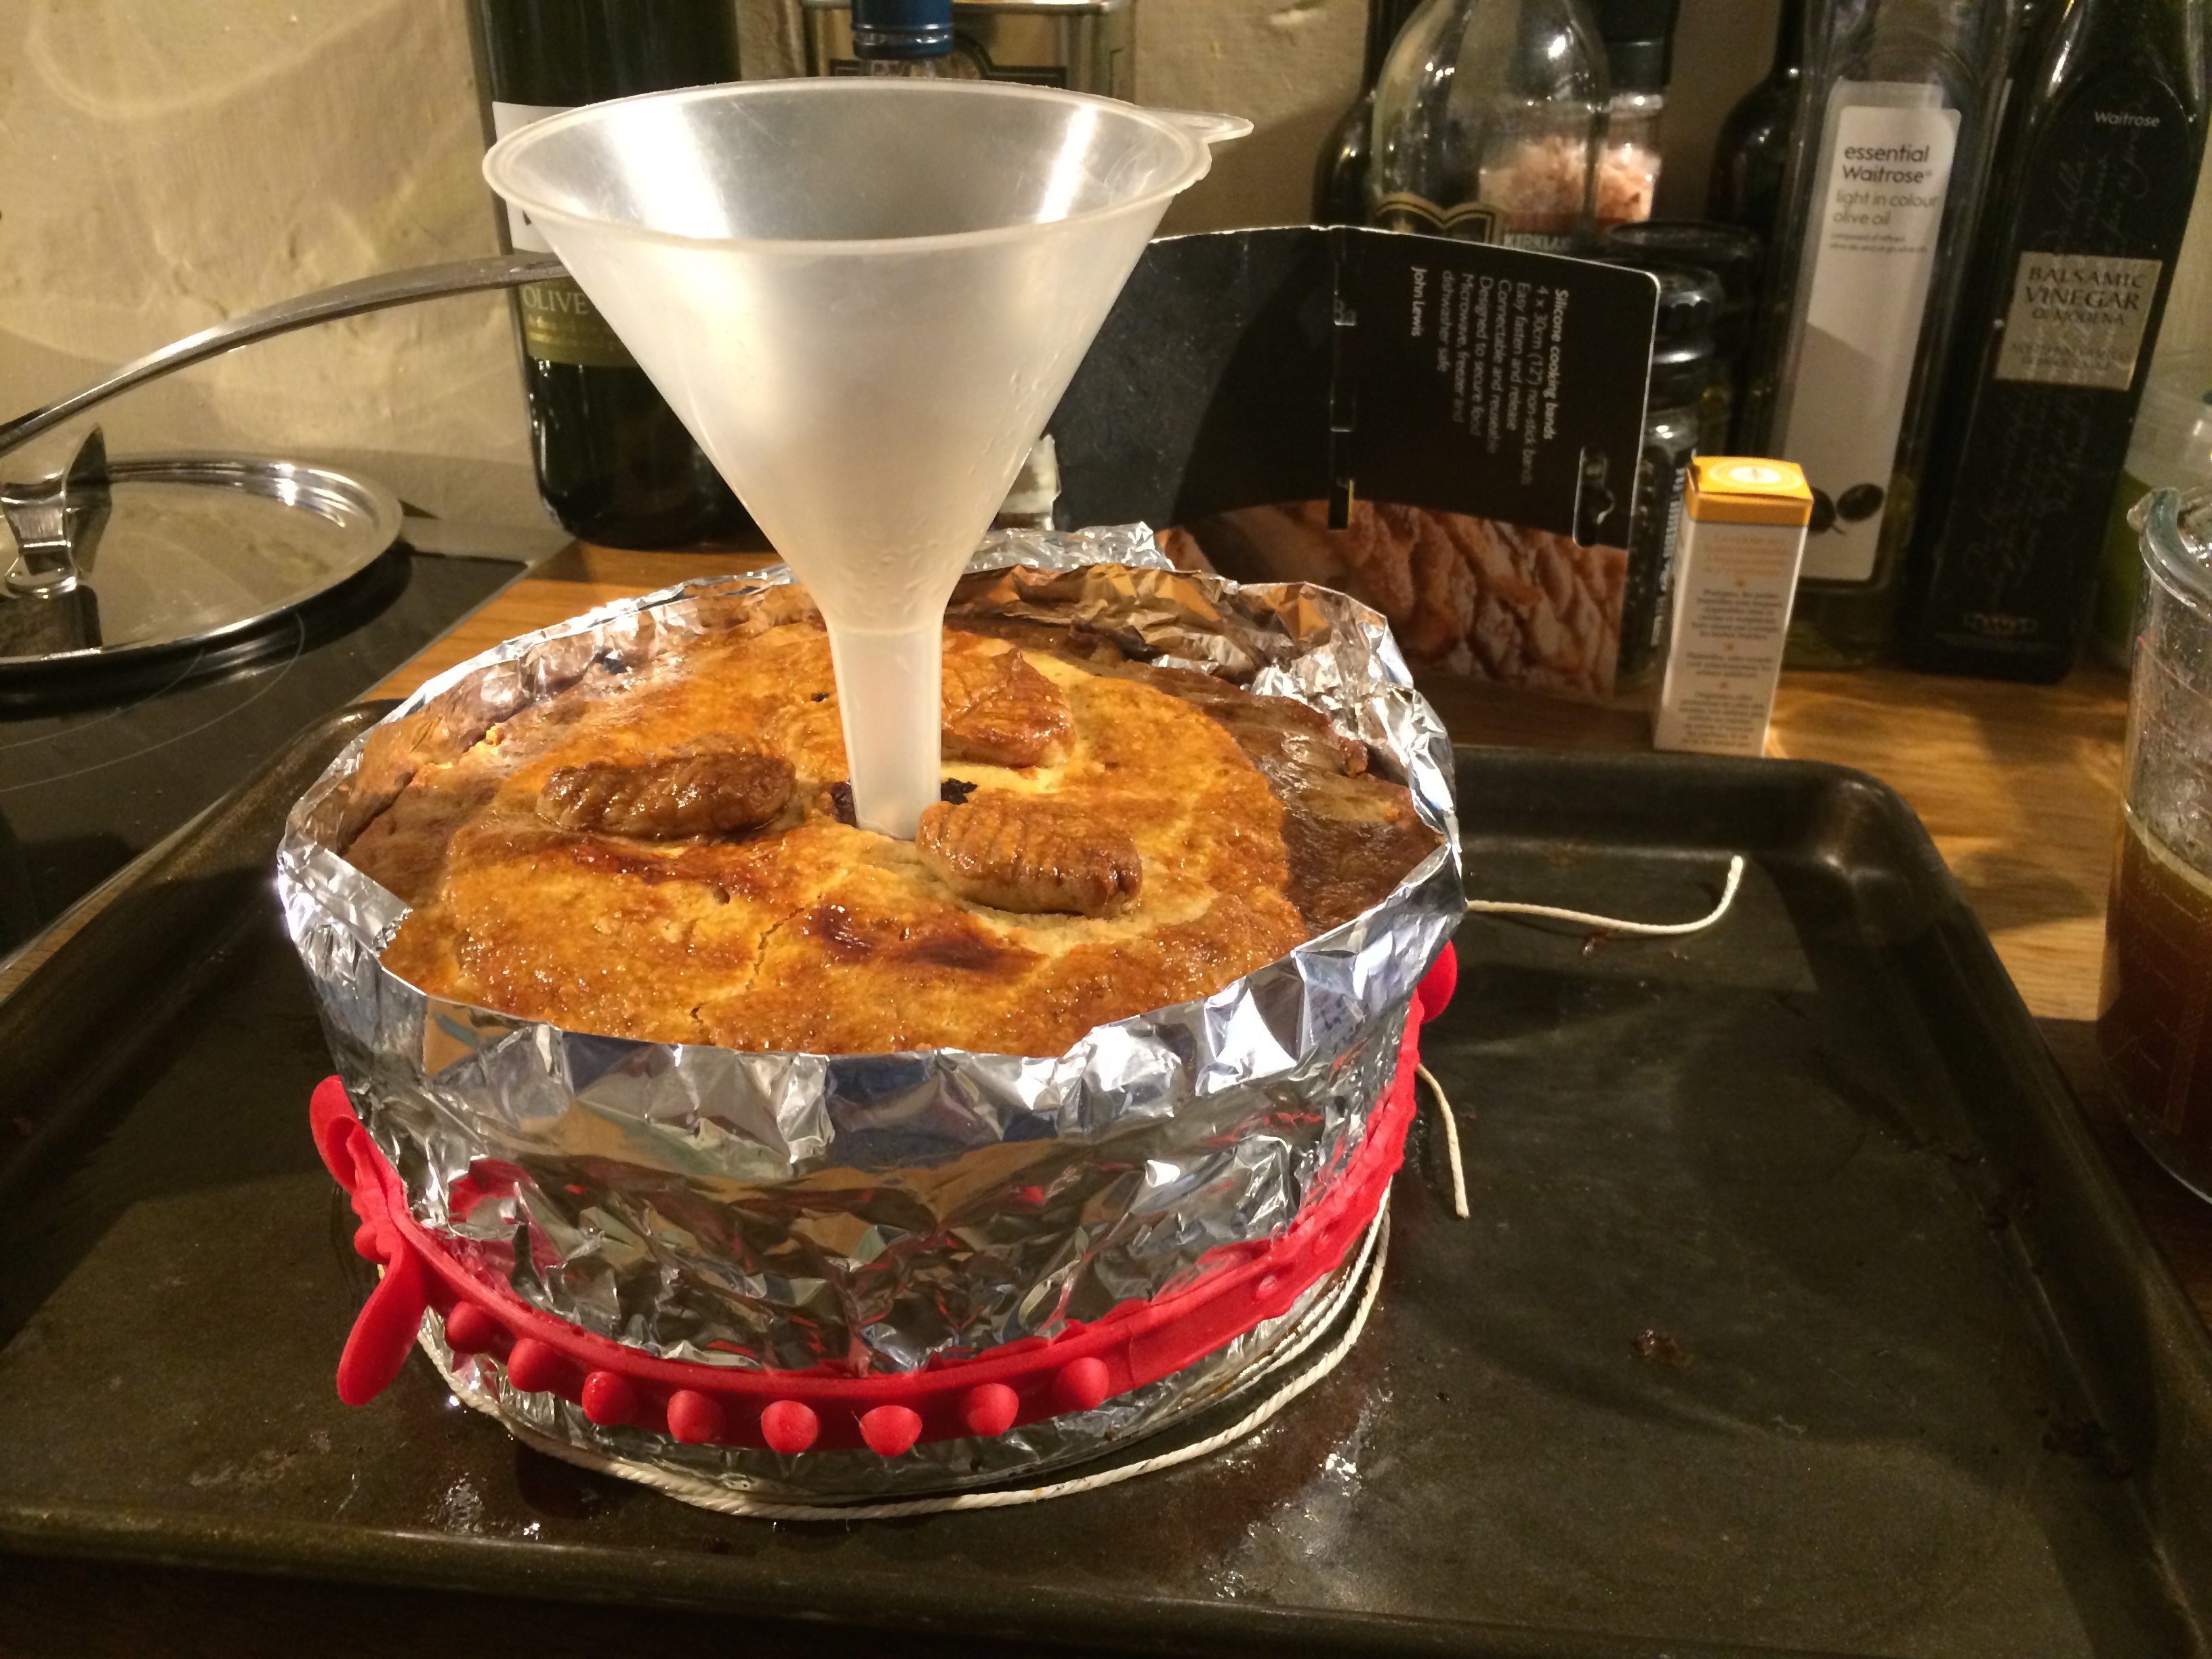
Pouring the Jelly
The next morning, I tentatively opened the fridge door to check. There was a little more leakage, but not too much. There was certainly had to be more jelly left in the pie than had escaped onto the plate. But boy did that jelly look good! The leaks had set firmly, and when I pulled a piece off to taste, it had a fabulous texture. Perfectly firm to the touch, but meltingly soft in the mouth. And flavour! It tasted excellent. I had a good feeling about this pie.
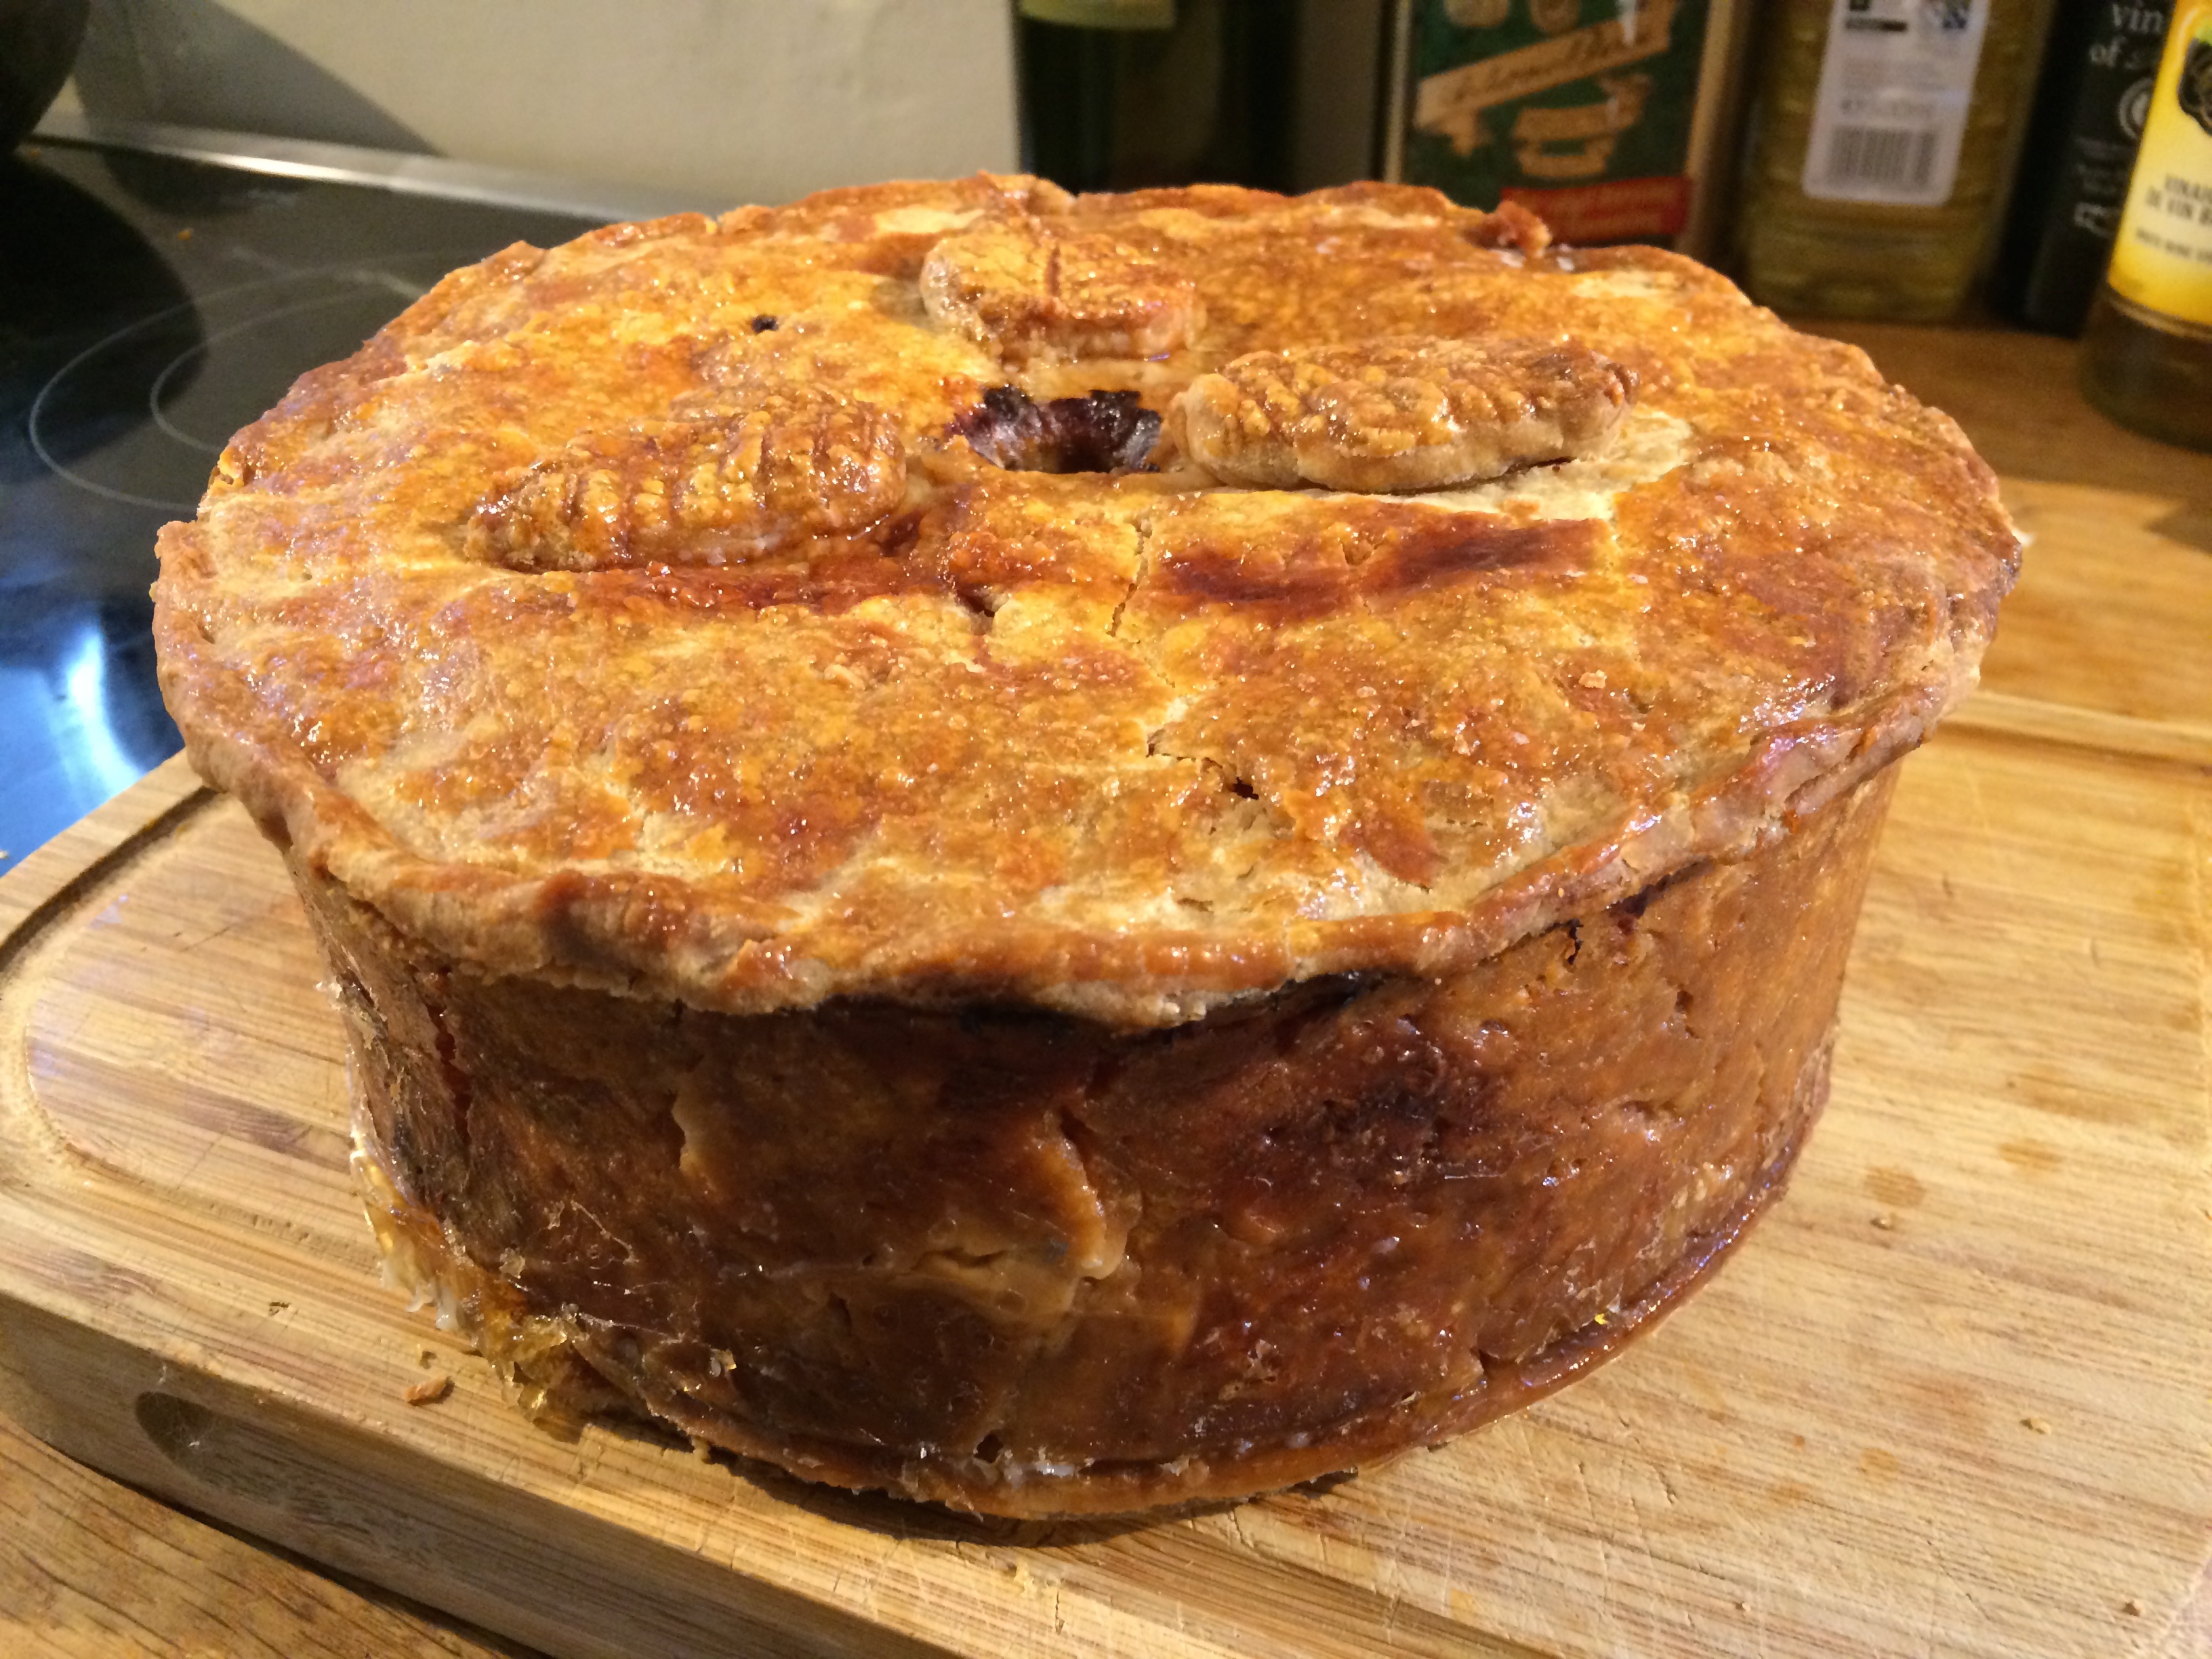
The Finished Pie
I dismantled the silicone bands and foil to reveal the final pie in all its glory. It was certainly a spectacular beast. Well, that was lunch sorted! Of course, the big reveal was still to happen. I had to cut into the pie and see how the inside looked. I took the knife, and with some trepidation, cut into the pastry. It felt firm, a nicely solid texture. As I pulled the first slice away, I could see the that the jelly had nicely filled the lower gaps, but not made it into the upper corners – too many leaks for that to be wholly successful, but not bad, considering. I cut another slice and served it for lunch with some home-made piccalilli on the side.
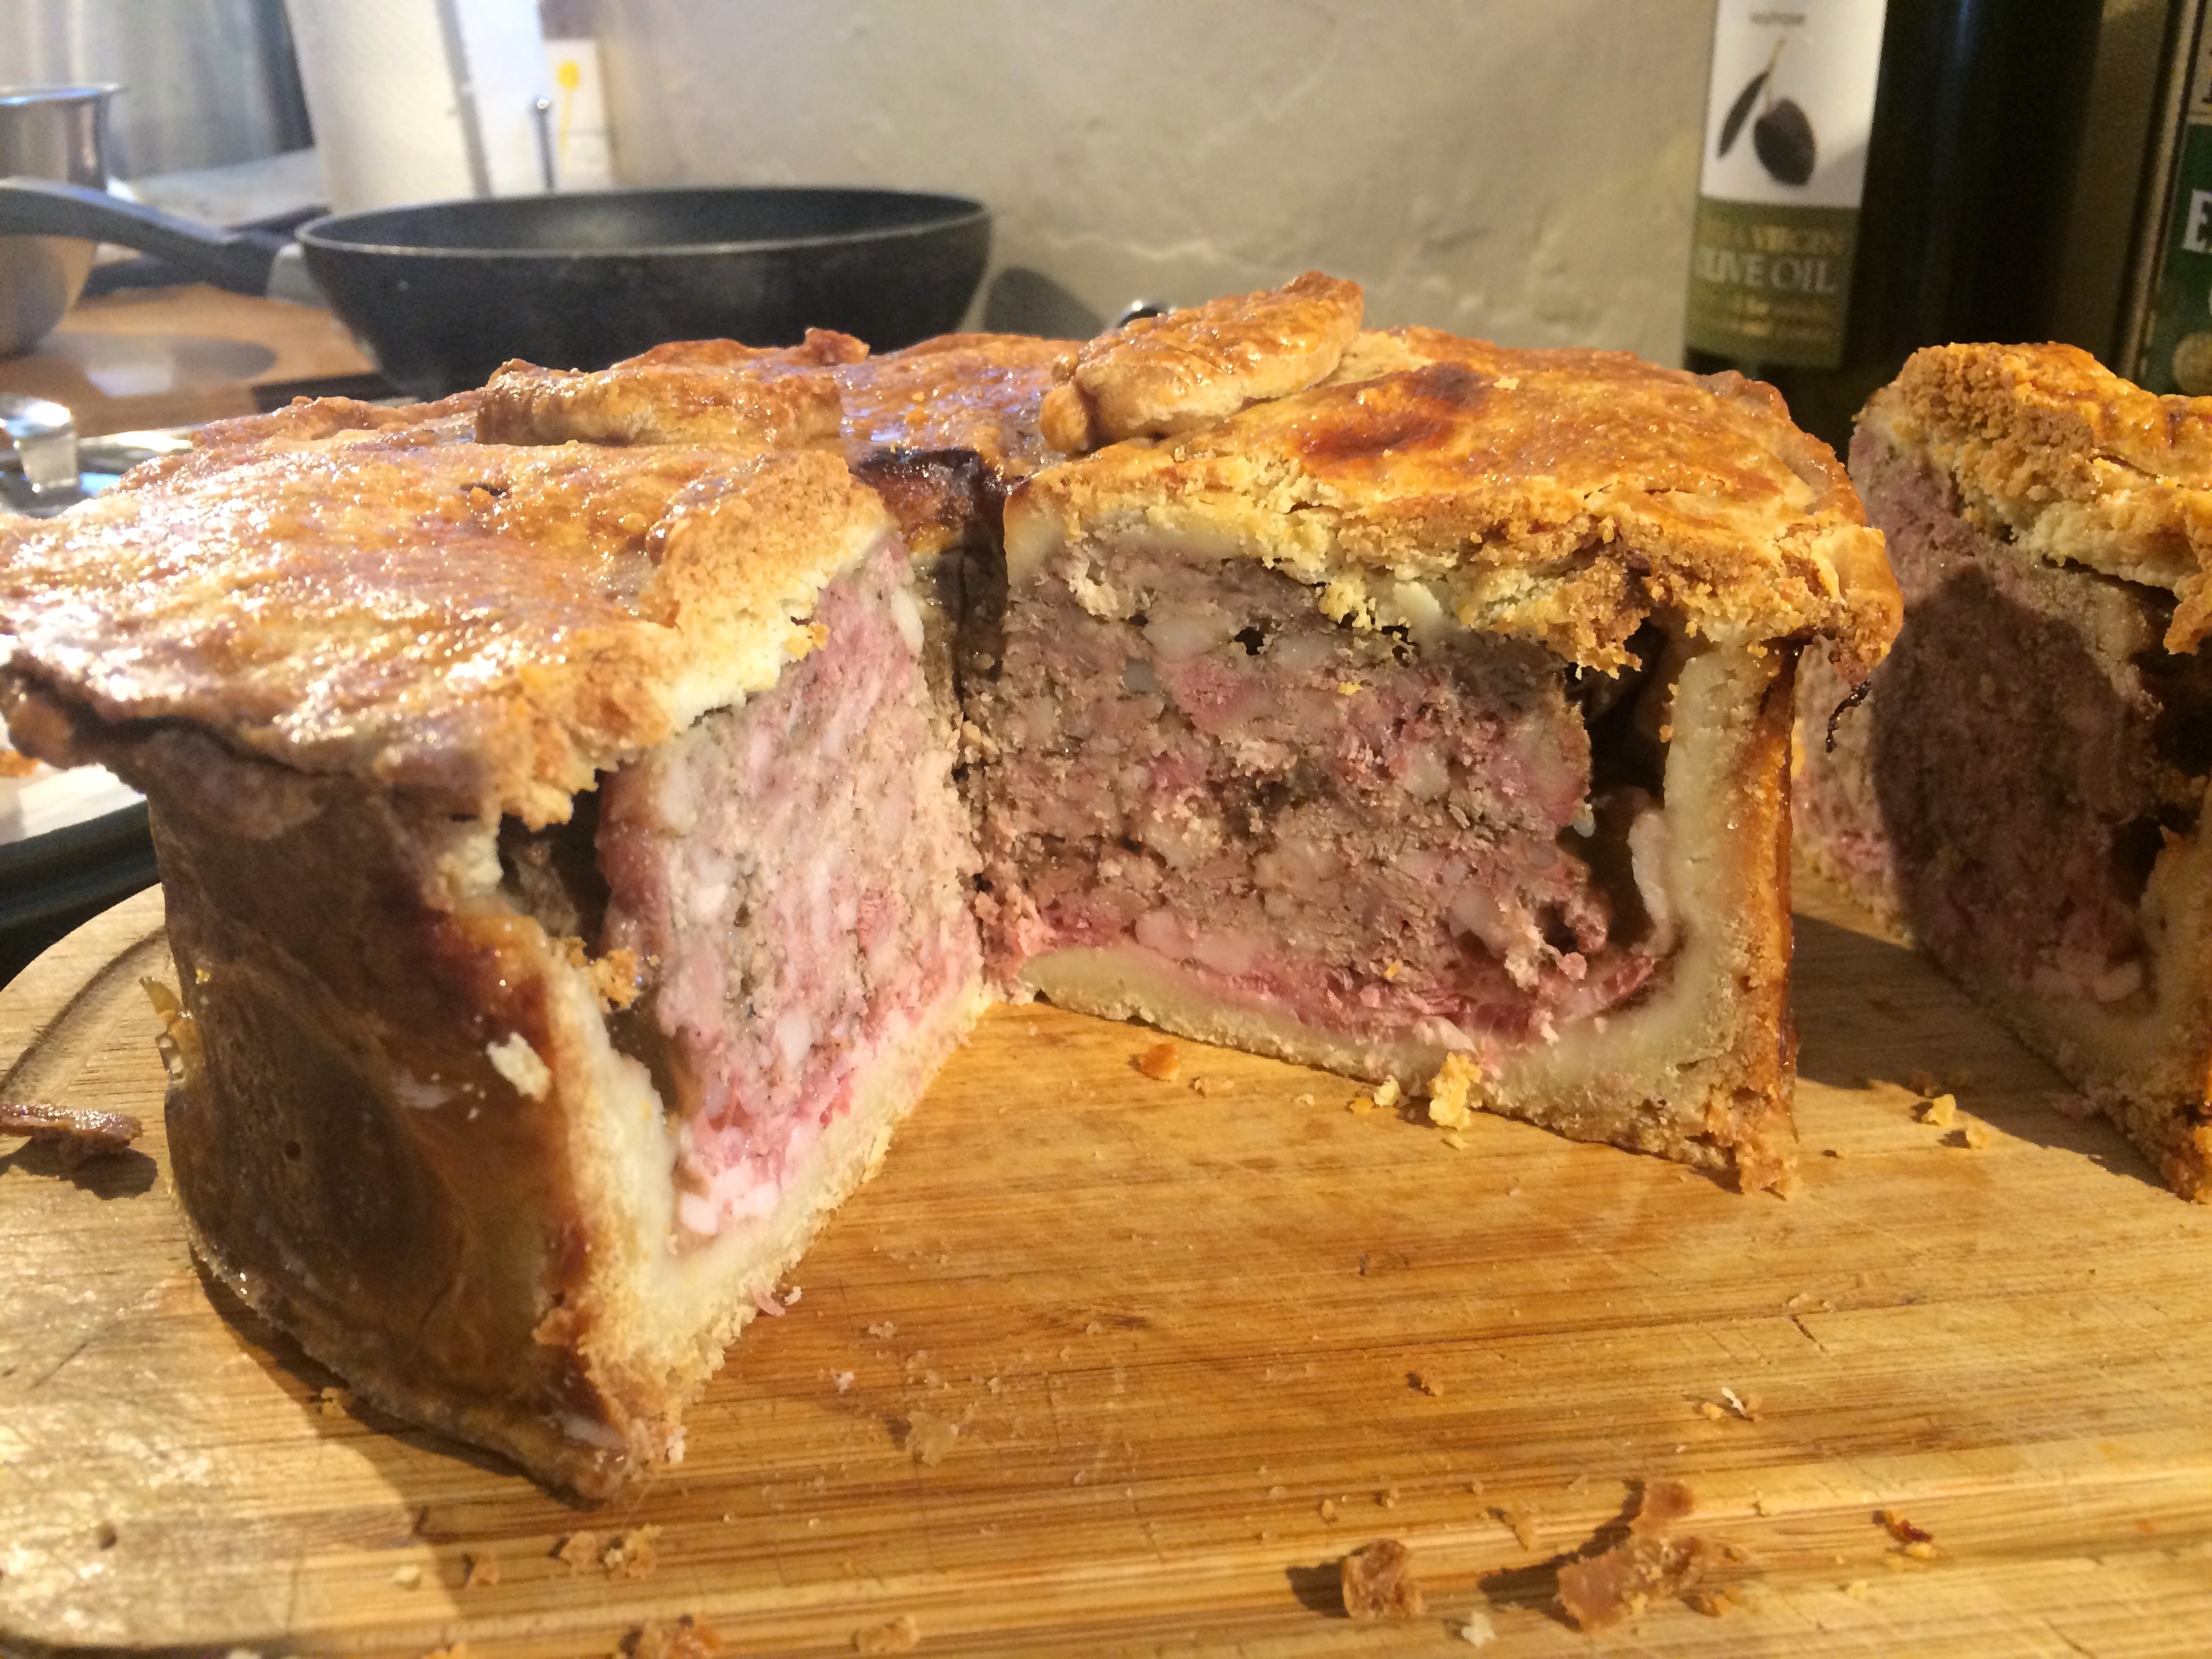
The Pie Interior
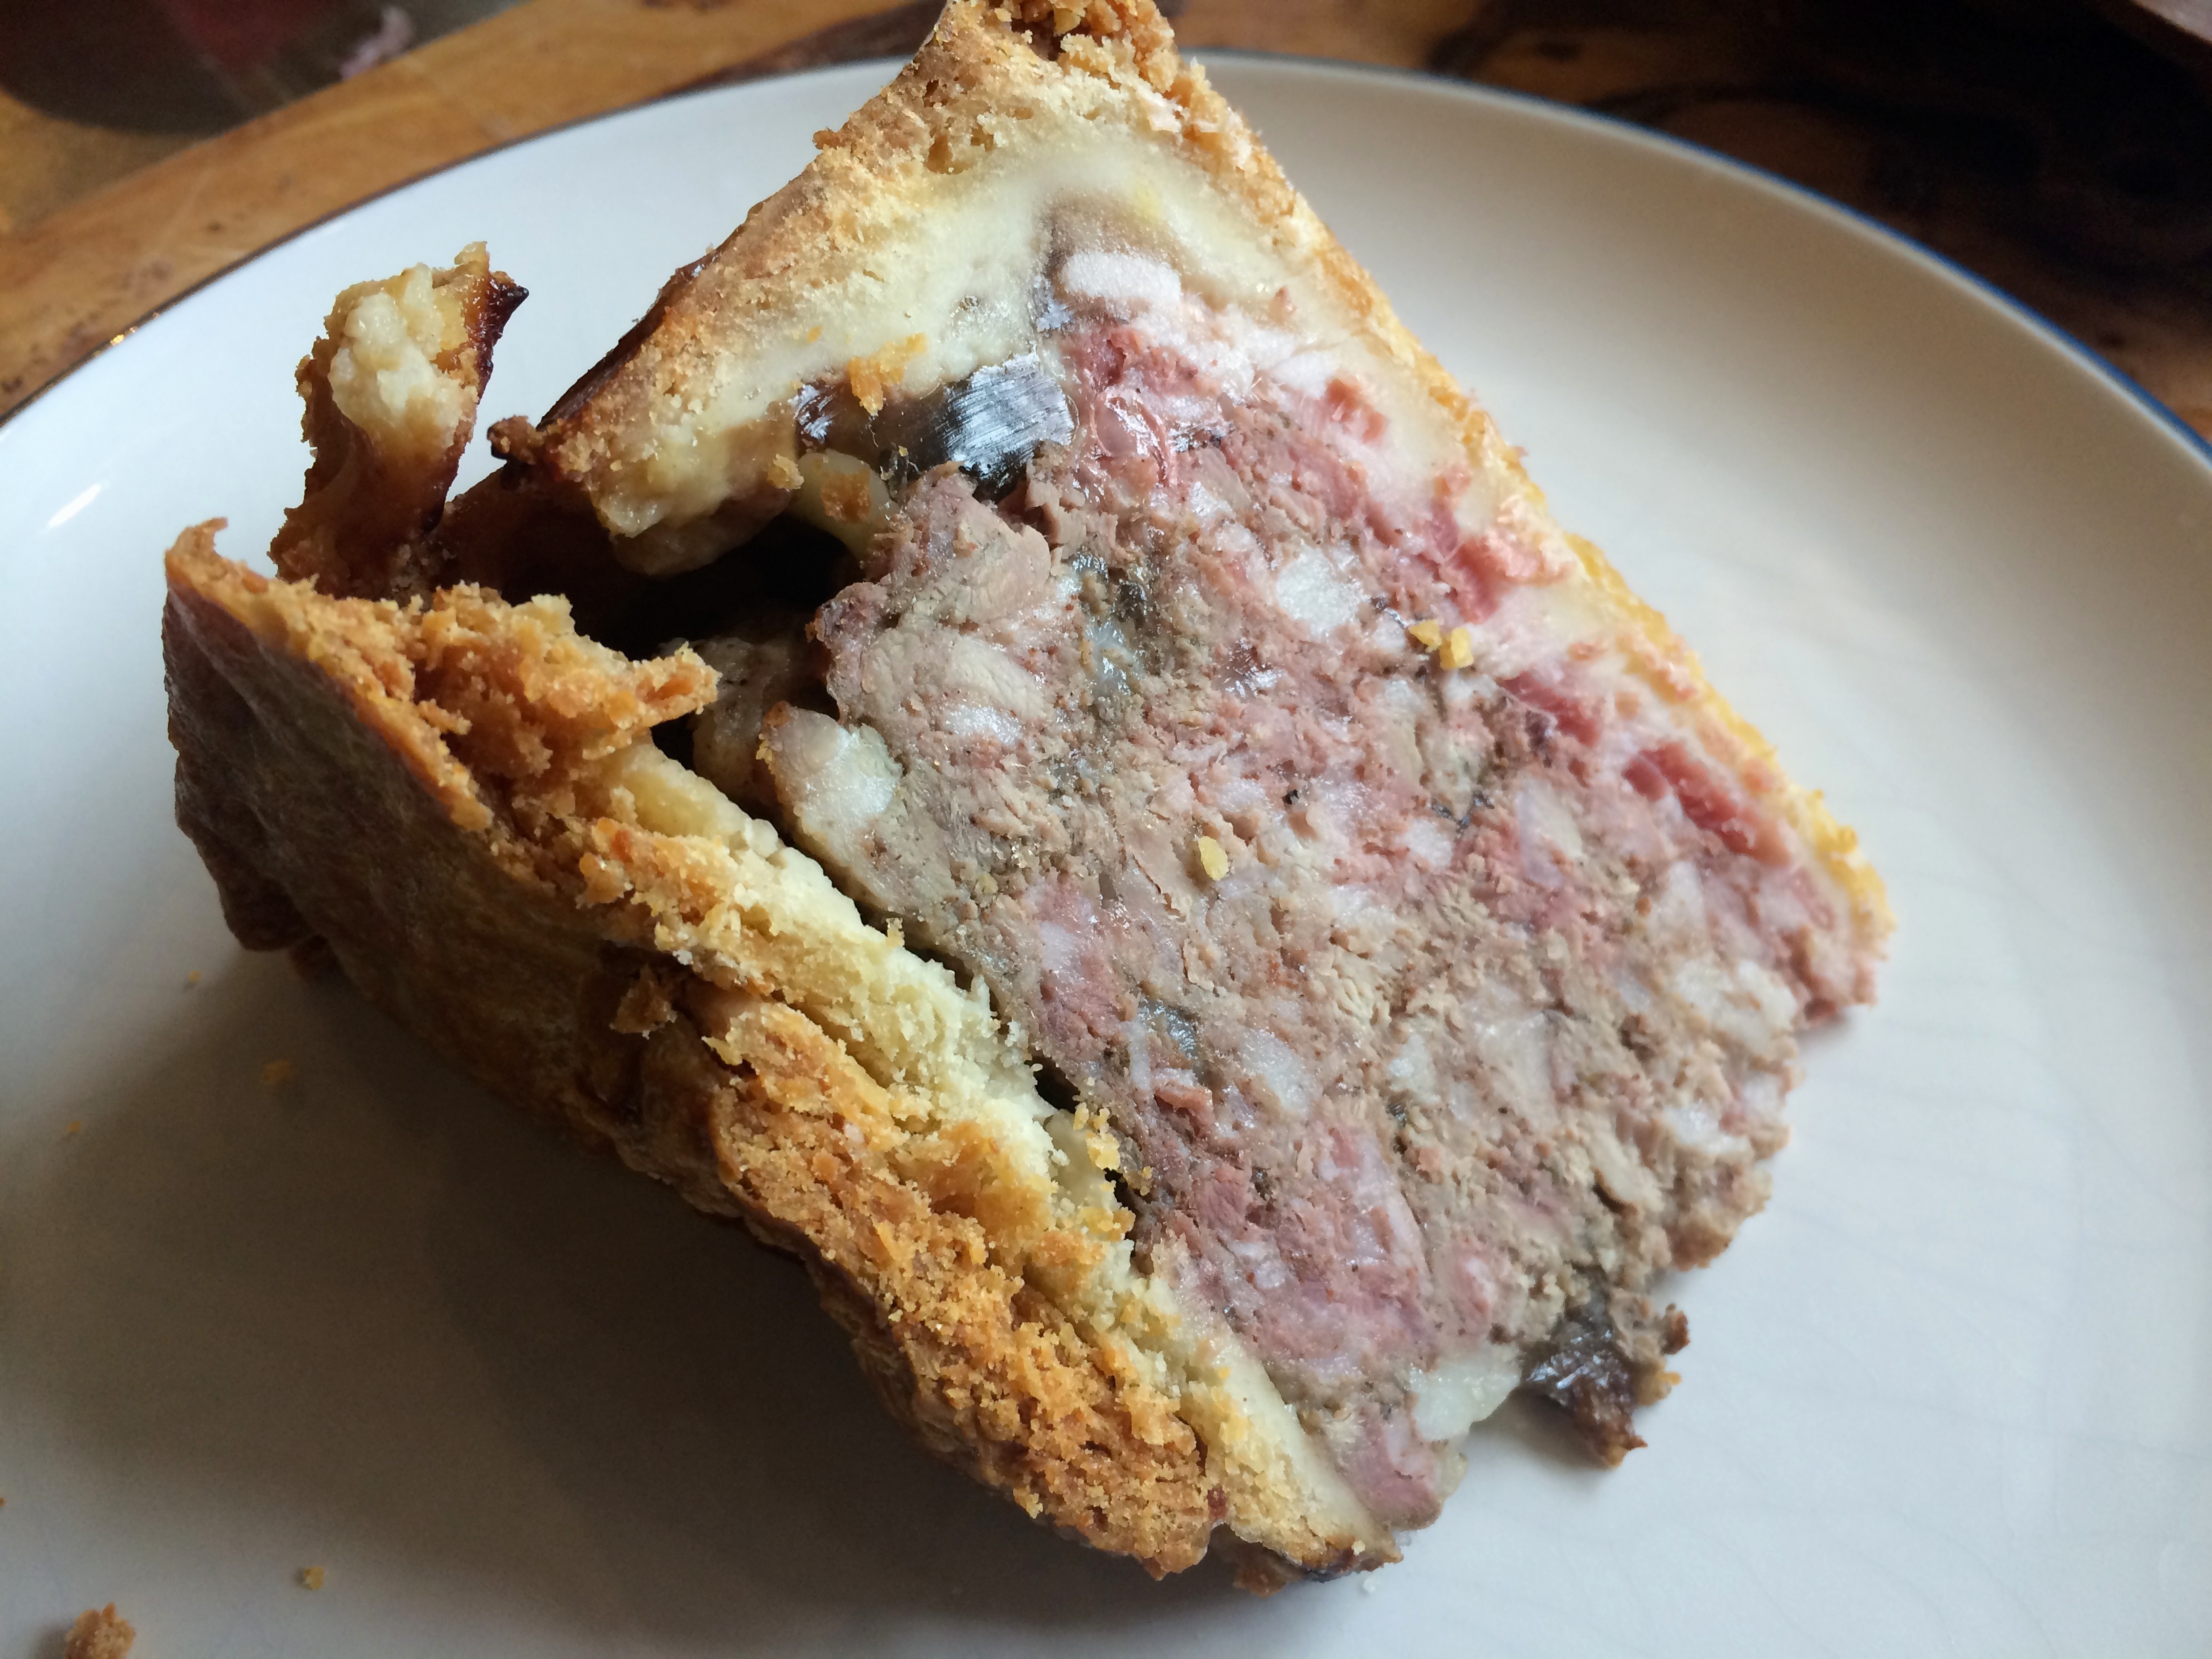
A Slice of Pie
The pie was marvellous. Very tasty filling, perfectly crisp pastry shell. I think the key ingredient here was the jellied stock, it really was like no jelly I have tasted before and well worth making from scratch. I will definitely make this again, and I am determined to one day master the art of the unbroken pastry wall.
Sue says:
Pork Pie! Well, this is about the 3rd or 4th pork pie adaptation Dave has made and this is by far the best.
The flavour of this is so good. The meat is not strong but it is very flavourful and the jelly (made with pigs feet no less) is extremely tasty. Although he repeatedly has issue with his pastry cracking which makes getting the jelly in evenly rather more difficult than it should be, he uses engineering skills, foil and string to great effect.
On this pie the pastry is crisp and golden, glistening like a sugar glaze, and has all the flavour that is normally lacking in pork pie pastry.
The only way to improve this would be to have a flawless crust that made filling the jelly easier and more even.
10/10
Looks mouth-wateringly good…
I have been making this every Christmas since 1975 and enjoy the unpredictable bits like the side fissures and getting the spices right. On it tomorrow and may try just a little less water. But always a splendid epiphany and a joy to do. You are right – real jelly makes such a difference. I line the springform cake tin with baking paper to prevent the sticking. Big pie needs thick walls though! This isn’t fine embroidery. I have tried some of her other fillings but nothing beats the pork. One year, a little short of pork, I threw in some Irish pork sausage meat. Keep an open mind. And always make sure you have some decent home made chutney at hand or a caramelised onion marmalade. If it can sit for a day or two in the fridge it will integrate well. Let it come up a bit from fridge temperature. Lovely blog. Thanks. Maintain the rage for a real pork pie. Best with real ale!